Butternut squash, with its nutty flavor and variety of uses, is one of my family’s fall favorites. With its thick skin, it’ll actually keep for several months as-is when stored in a cool, dark place. Unfortunately I don’t have many cool, dark places around my house where I like to food, so when I get my hands on some butternut squash, either from the farmer’s market or from our own garden, I like to prep and freeze it so it’s ready when I want to incorporate into meals.
Freezing butternut squash at peak ripeness not only extends its shelf life but also locks in the nutrients and flavors, making it a convenient and healthy option for winter meals. In this post, I’m going to step you through my two favorite methods of freezing butternut squash. Keep reading to find out how to enjoy this seasonal winter squash all year round!
Peeling and Cutting
No matter what method you use to freeze it, you’ll need to start by peeling and cutting the butternut squash. For detailed instructions, you can visit the post I just linked, but here’s a quick run-down:
- Wash the butternut squash, pat it dry, and cut the ends off so they’re flat and can remain stable on a cutting board.
- Stand the squash upright on the cutting board and peel the skin using a vegetable peeler. Flip it over halfway through to make it easier to do both ends.
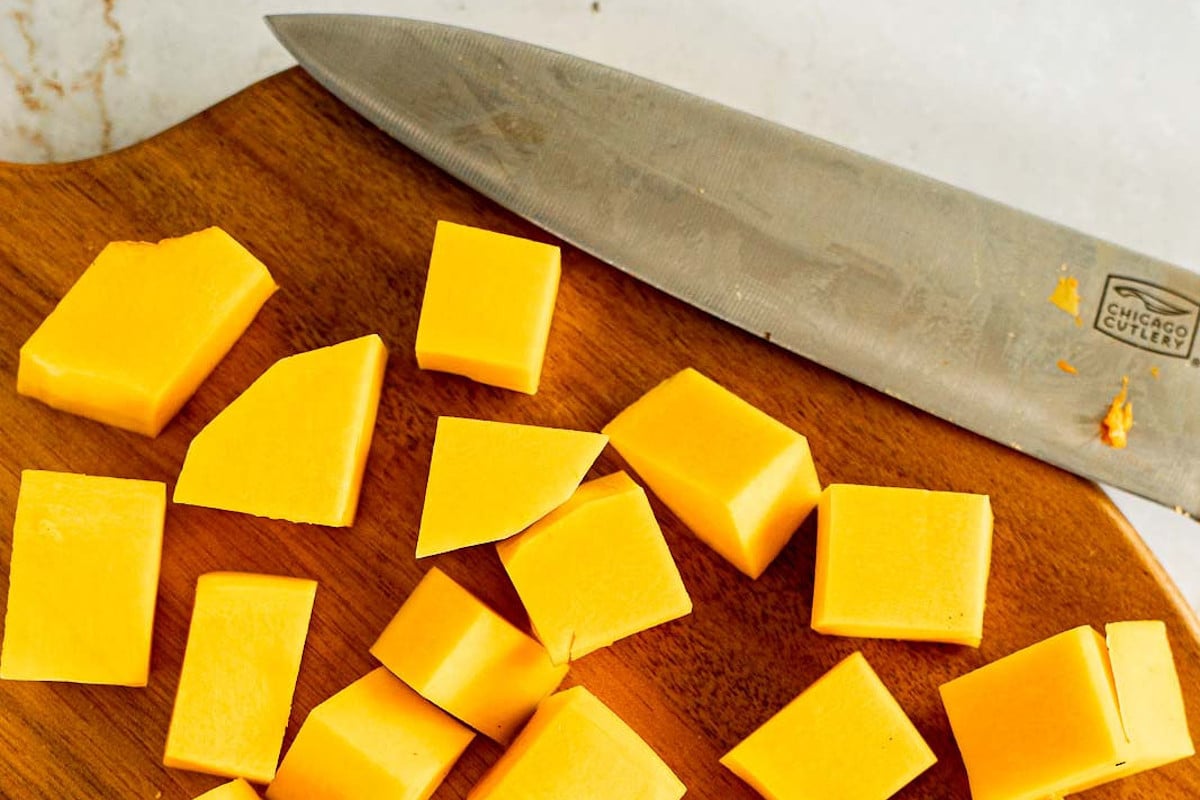
- With the peeled squash standing upright, use a chef’s knife to cut all the way down the middle so the squash ends up in two equal halves.
- Scoop the seeds out of each half with a spoon, and then cut up the squash into cubes.
From here you have a couple of options…
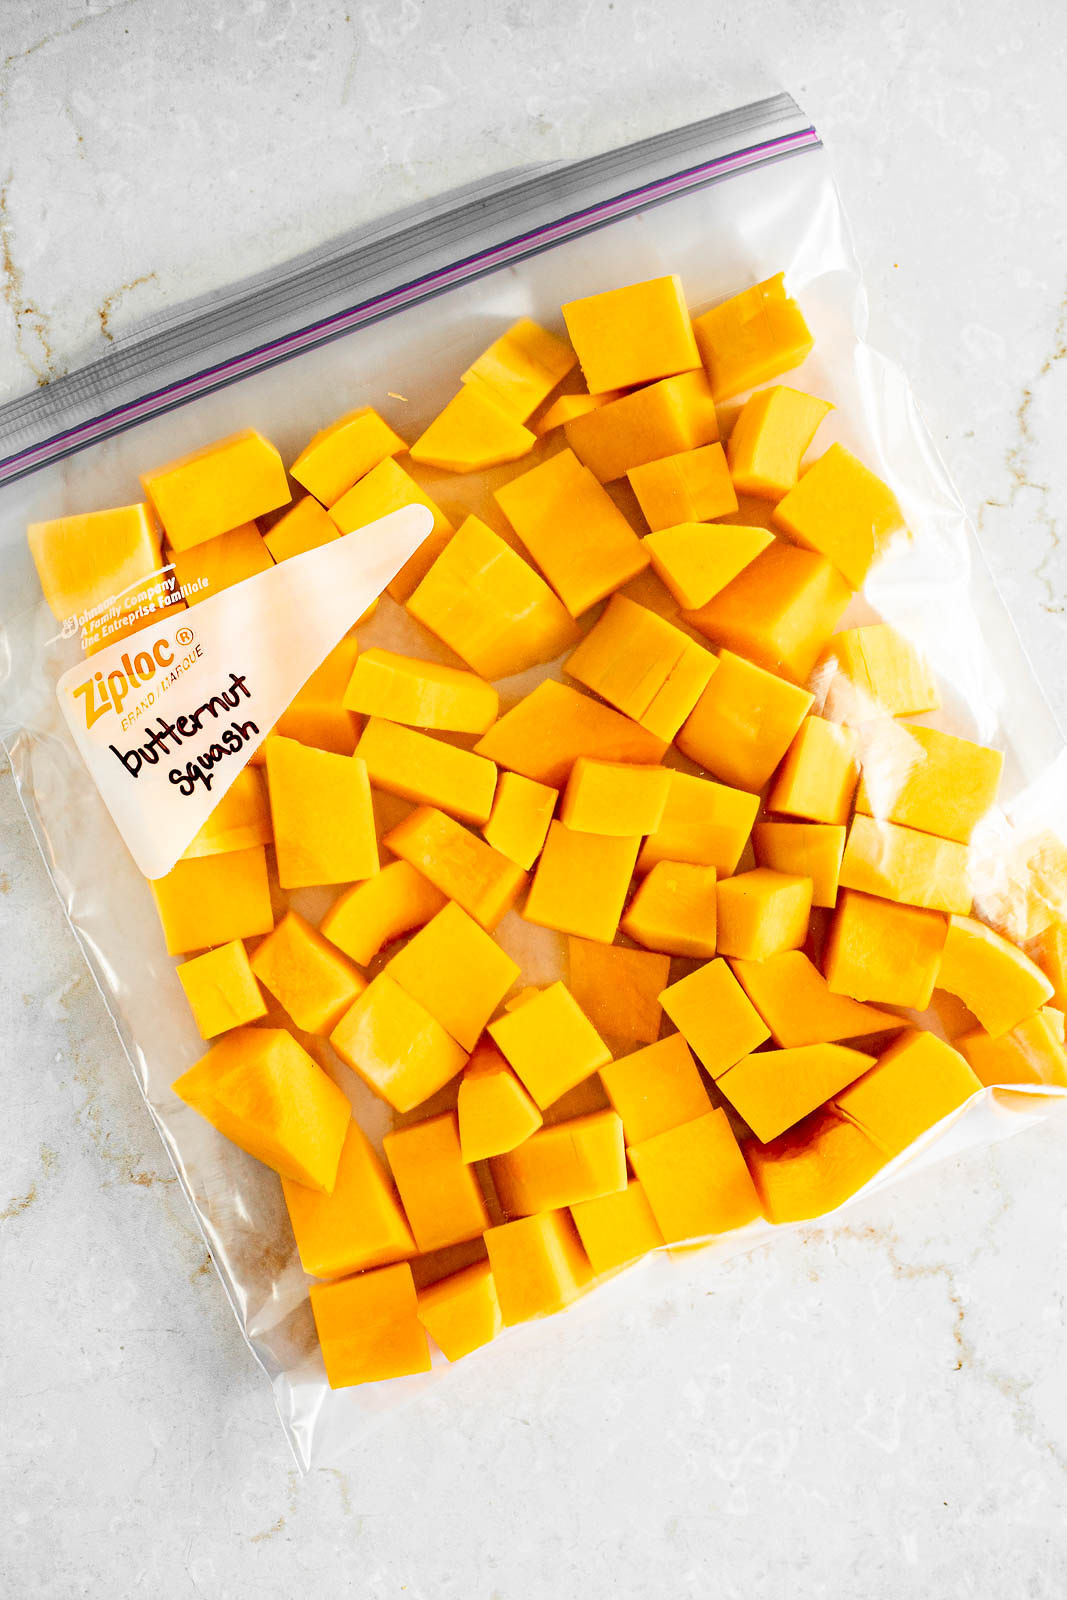
Method #1: Just Freeze the Cubes
First I’m going to tell you what you should do and then I’ll tell you what I do…
What you should do is blanch the butternut squash cubes before freezing them. It’s a simple process: boil a pot of water, add the squash cubes, and boil them for 3-5 minutes. Using a slotted spoon, transfer the squash cubes to an ice water bath to immediately stop the cooking process. Pat them dry and they’re ready to freeze.
Blanching before freezing helps inactivate enzymes that can cause changes in flavor, color, and texture during storage. It helps maintain the squash’s vibrant orange color, natural sweetness, and firm texture, ensuring that it remains as delicious and nutritious as when it’s eaten fresh.
Having said that, I’m going to tell you a secret: I don’t always blanch my butternut squash before freezing (gasp!). It really depends on how long I’m planning to freeze it. If it’s going to be in the freezer for a while, sure―I blanch it. But if I’m going to use it within a week or two, I skip the blanching.
Whether you blanch or not, I highly recommend placing the cubes on a parchment-lined baking sheet and pre-freezing for about an hour before placing the cubes into a freezer bag for long-term storage (3-4 months in a regular freezer or 8-12 months in a deep freezer). This will help ensure that the squash cubes don’t freeze together in a big glob that requires an ice pick to break apart when you take it out of the freezer.
Method #2: Roast, Puree, Divide, & Freeze
This method is perfect for when you want to freeze butternut squash to use as an ingredient in dishes like dips, baked goods, and soups. Here’s the process:
Roast: Start by roasting your cut up cubes of butternut squash. It’s as simple as this:
- Preheat oven to 400°F and line a large baking sheet with parchment paper.
- Spread the butternut squash cubes evenly on the parchment and drizzle with olive oil. Sprinkle with salt and pepper (note: you can skip the seasoning if you want to later use the squash as an ingredient in non-savory dishes, like baked goods, for example).
- Roast for 30 to 35 minutes until the cubes are tender and starting to turn golden brown on the edges.
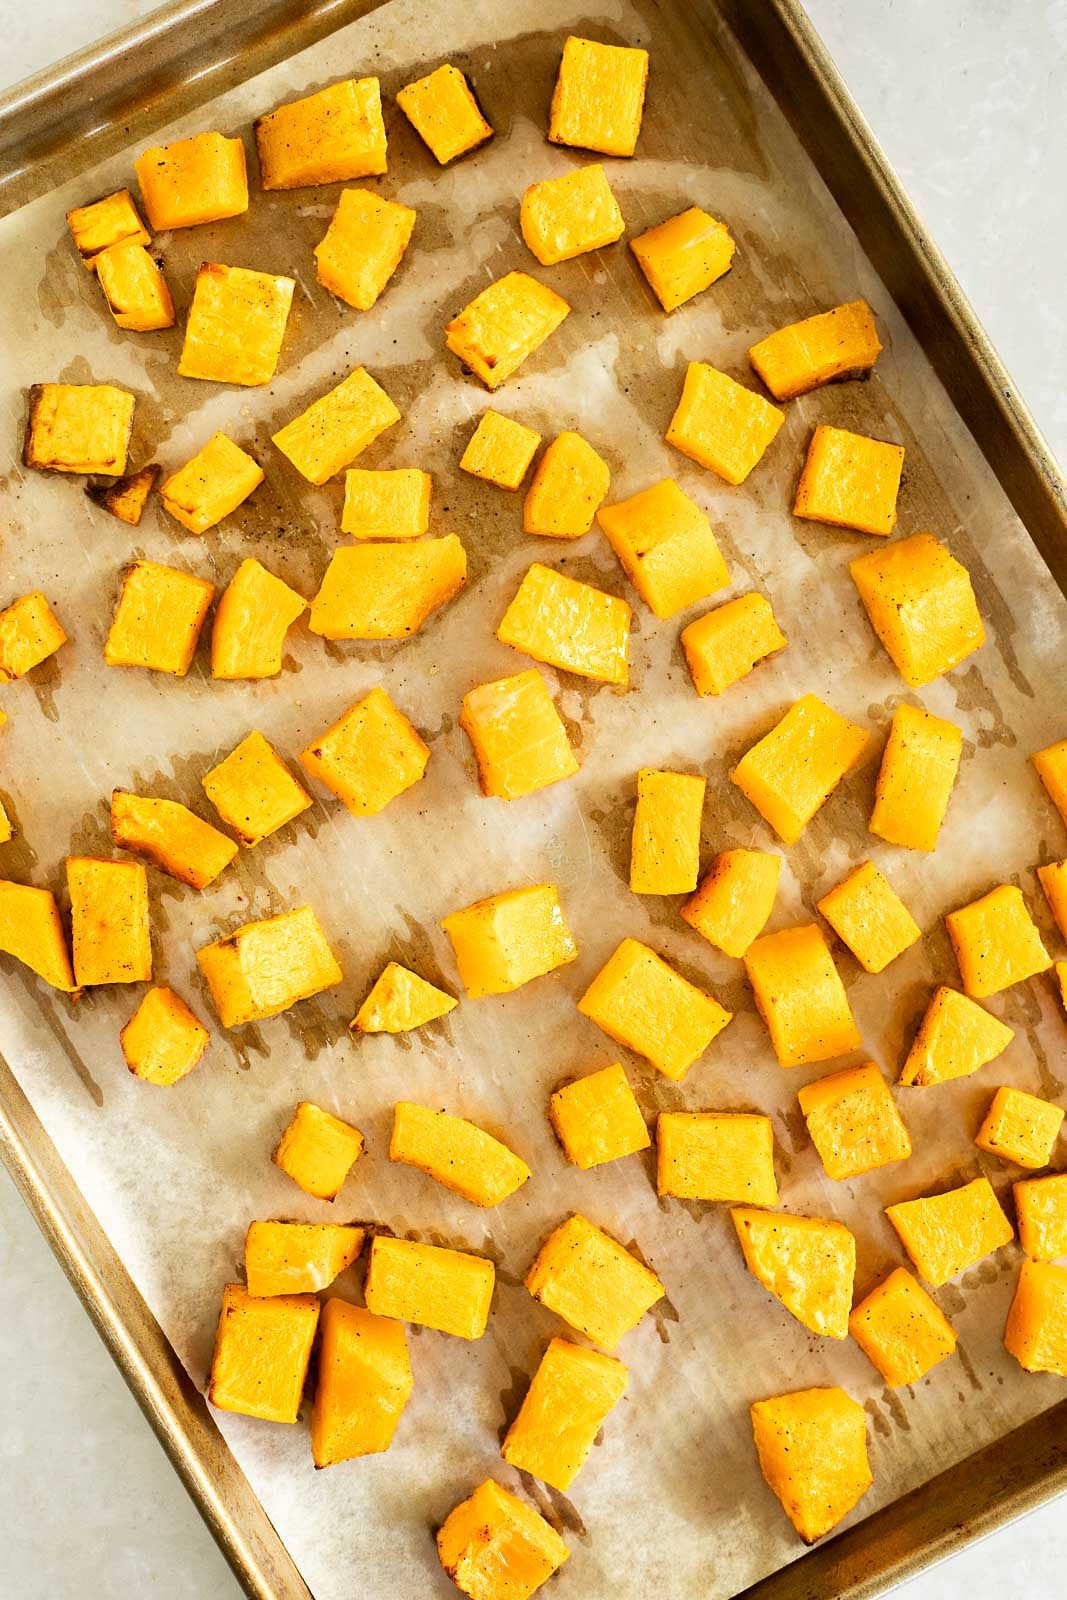
The thing I like about this method is that I can immediately serve and enjoy a portion of the roasted butternut squash as a side with my dinner while the rest of it cools on the baking sheet. Then with a couple of extra steps during clean-up, I can knock out some time-saving meal prep.
Note: another option for roasting is to keep the skin on the butternut squash, cut it in half and scoop out seeds, poke some holes through the skin, roast the entire thing face-down, and finally scoop out the cooked squash. That’s a fine method, too, but I prefer my method as takes a little less time and it cooks the squash more evenly. Your mileage may vary.
Puree: Once the roasted cubes have cooled, toss them into a blender or food processor and pulse until smooth. Although it may be tempting, don’t add any liquid at this point as it can ruin the consistency of the butternut squash.
Divide: Using an ice cream scoop or spoon, distribute the pureed butternut squash evenly into a muffin tin, ice cube trays, or these really cool Souper Cubes.
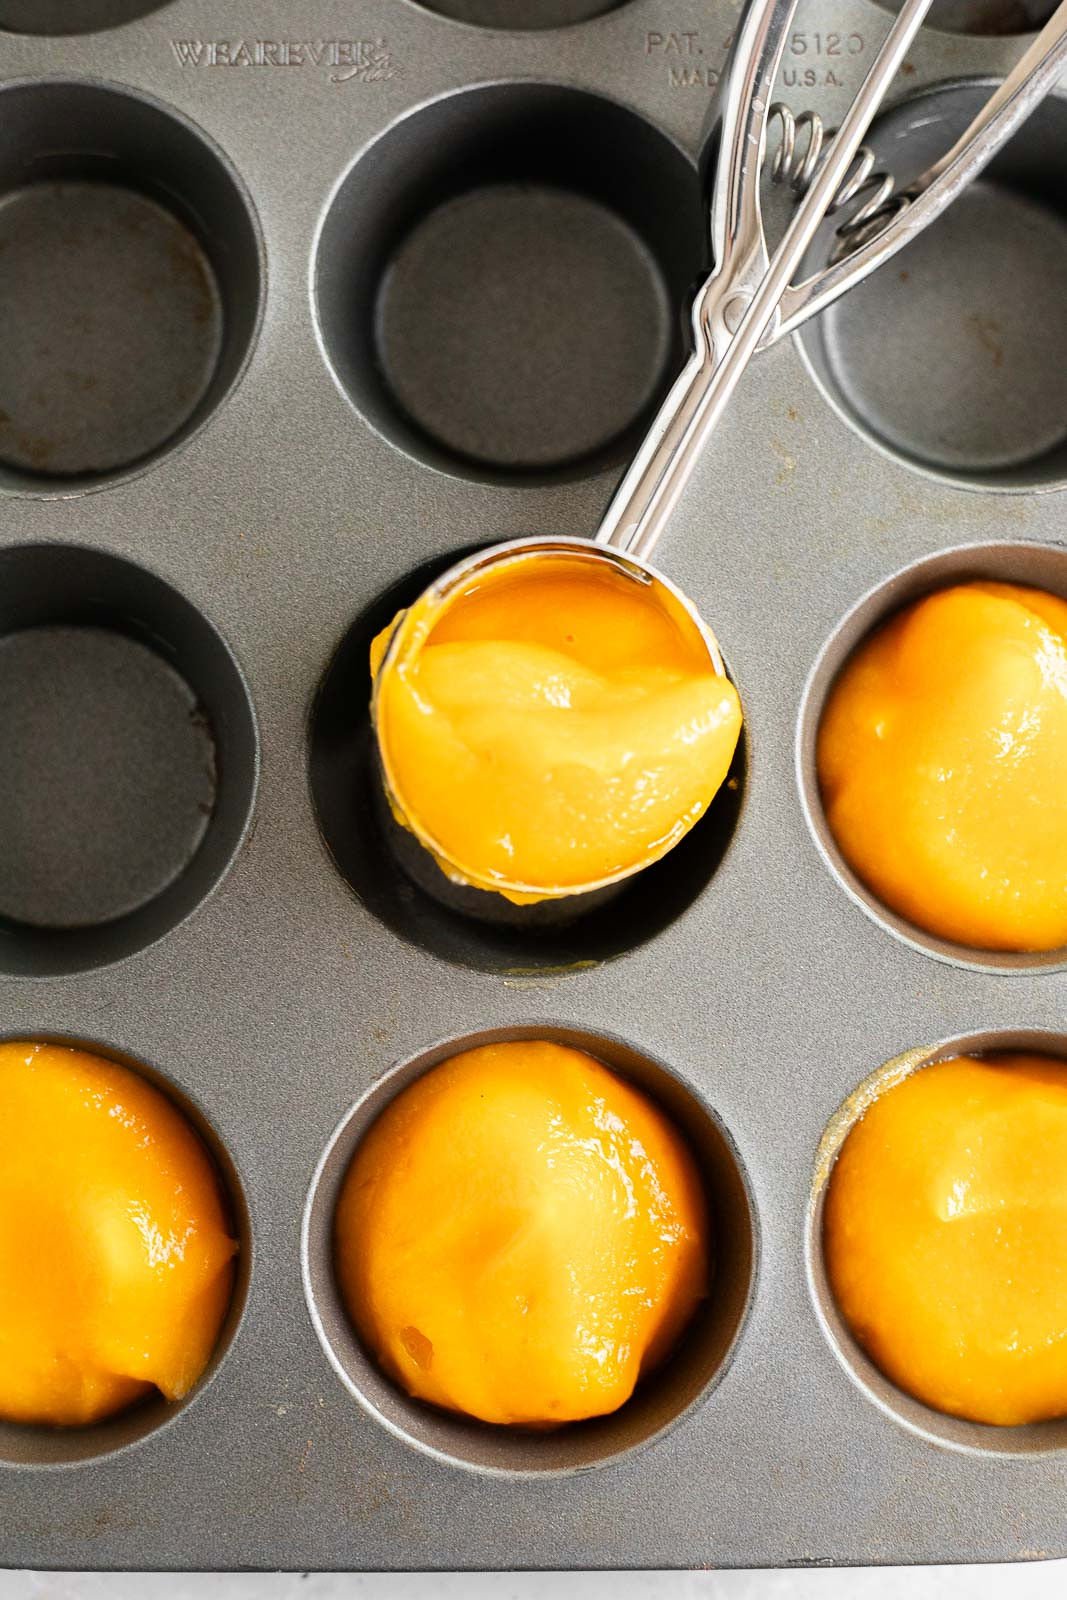
Freeze: Pre-freeze the divided butternut squash puree for about an hour in the muffin tin. They shouldn’t be too hard to remove since they won’t be frozen hard. Transfer the frozen squash puree pucks to a zip-top freezer bag and store in the freezer for 3-4 months (or 8-12 months in a deep freezer). Don’t forgot to label the bag with the date!
The second method takes a little time, but it’ll save you time in the long run since you’ll just need to grab whatever number of pucks you need and throw them into any recipe that calls for pureed butternut squash (it also makes a great substitute for pureed pumpkin since pumpkin is a winter squash, after all).
Thawing and Using Frozen Butternut Squash
When you’re ready to use your frozen butternut squash, you’ll want to thaw overnight in the fridge and reheat as needed. If you used method #1 above, you’ll cook it essentially the same way you’d cook a fresh cut squash. If you used method #2, it’s already cooked, so you can just re-heat or add as an ingredient to your favorite recipe. Try it in one of these great recipes:
- Maple Butternut Squash and Parsnip Soup
- Pumpkin Sage Soup (substituting butternut squash for pumpkin)
- Mung Bean Stew with Butternut Squash
How to Freeze Butternut Squash
Ingredients
- 1 butternut squash peeled and cut into 1" cubes
Instructions
Method #1: Blanch and Freeze
- Boil a pot of water and carefully add cubes of butternut squash with a slotted spoon. Boil for 3-5 minutes.
- Using a slotted spoon, transfer the squash cubes to an ice water bath to immediately stop the cooking process. Pat them dry and allow to air dry for 10-15 minutes before freezing.
- Arrange squash cubes on a parchment-lined baking sheet and pre-freeze for about an hour. Once the cubes have hardened up, transfer them to a plastic freezer bag, label the bag with the current date, and store in the freezer for 3-4 months.
Method #2: Roast, Puree, Divide, & Freeze
- Preheat oven to 400°F and line a large baking sheet with parchment paper.
- Spread the butternut squash cubes evenly on the parchment and drizzle with olive oil. Sprinkle with salt and pepper (note: you can skip the seasoning if you want to later use the squash as an ingredient in non-savory dishes, like baked goods, for example).
- Roast for 30 to 35 minutes until the cubes are tender and starting to turn golden brown on the edges. Remove from oven and allow to cool.
- Once the roasted cubes have cooled, transfer them to a blender or food processor and pulse until smooth.
- Using an ice cream scoop or spoon, distribute the pureed butternut squash evenly into a muffin tin or ice cube trays.
- Pre-freeze the divided butternut squash puree for about an hour in the muffin tin. Transfer the frozen squash puree to a zip-top freezer bag, label the bag with the current date, and store in the freezer for 3-4 months