If you’ve been reading this blog for a little while, you know that I am fascinated with and love to make lacto-fermented/cultured foods. Lacto-fermenting is a great natural preservation technique that also happens to confer numerous health benefits.
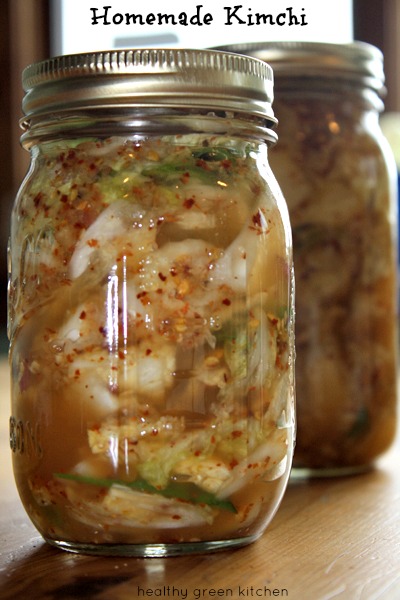
One of my favorite cultured foods to make is Kimchi (aka Kim chi and kimchee): Korean spicy pickled cabbage.

Kimchi is high in natural probiotics that aid digestion. It also contains lots of vitamin C as well as compounds that may protect you from cancer.
I have made Kimchi many times before, but when I saw this tutorial on how to make Kim chi from Dr. Ben Kim, I knew I had to try it.
The Homemade Kimchi recipe calls for fine Korean red chili flakes, but I didn’t have these. I used regular crushed red pepper flakes instead, and I decreased the amount to 2 Tb. The Kimchi came out incredibly spicy- I love it, but you may want to tone it down a bit and use just 1 Tb. if you are using the standard red pepper flakes.
Another option when making Kimchi is to use a seeded minced jalapeno or Serrano chili pepper or two instead of making the chili paste, or you could try a tablespoon or two of a prepared spicy Asian chili paste.
Feel free to add in some extra vegetables if you like- some of my favorite additions to Kimchi include sliced leeks, daikon radish, and carrots.
Kimchi will keep about 1 month in the refrigerator, and it will continue to ferment a bit during that time. It will get more sour as it ages, and if you don’t like this, Dr. Kim recommends eating it up with in the first week.
Kimchi is a delicious and healthy side dish that goes with most Asian-inspired meals. I also like it over scrambled eggs, and mixed into chicken soup. Adding a little coconut milk to the soup tempers the spiciness and meshes very well with kimchi’s flavors!
Homemade Kimchi
Equipment
- Mason jar very clean
Ingredients
- 1 head Napa cabbage about one pound- outer leaves removes, and then chopped into bite sized pieces
- 1/4 cup sea salt mixed in a small bowl of warm water
- 1/4 cup Korean fine red chili flakes also known as ko choo kah rhoo, and available at Korean markets- if you don’t have access to the Korean chili flakes, you can substitute 1-2 Tb. crushed red pepper flakes as I did
- 1 tbsp garlic minced
- 1 tbsp ginger minced
- 3-4 green onions sliced
- 2 tbsp Thai fish sauce optional; leave it out if you want a vegan/vegetarian version and substitute 2 tbsp salt instead
- 1/2 yellow onion
- 1 apple Dr. Kim’s recipe calls for 1/2 an apple and 1/2 a pear
Instructions
- Place chopped cabbage leaves in a large bowl and pour the salt water over the cabbage leaves.
- Mix well and allow salted cabbage to sit for at least four hours, until the cabbage is quite wilted down.
- Place wilted cabbage in a colander and rinse very well to remove excess salt; transfer cabbage back to large bowl.
- Combine the fine red chili flakes with a little warm water, and stir gently with a spoon to create a red chili paste. If you don't have the red chili flakes, you can use crushed red chili flakes instead. Use 1-2 tablespoons, depending on whether you want it very spicy, or insanely spicy. Mix whichever chili paste you have with your cabbage. If you are mixing with your hands, be sure to use rubber gloves.
- Add minced garlic, minced ginger, green onions, and fish sauce, and mix well again.
- Place yellow onion and apple in a blender with one cup of water. Blend well, and then add this natural sweetener to the cabbage.
- Pour over the cabbage, and mix well so that all the ingredients are distributed evenly.
- Spoon the cabbage into glass jar(s). Push down on cabbage leaves as they stack up inside the bottle.
- Transfer any liquid that accumulated during the mixing process into the bottle as well – this liquid will become kimchi brine. Some liquid will also come out of the cabbage leaves as you press down on them as they are stacked in the bottle.
- Be sure to leave about 2 inches of room at the top of the bottle before capping it tightly with a lid (if you don't leave enough room, you may end up with some liquid seeping out of your jars as it ferments). Allow your kimchi to sit at room temperature for 24 hours before transferring to the refrigerator for storage.


