This week marks three years since I started Healthy Green Kitchen. What a journey it has been: I’ve written over 500 posts!
It’s pretty safe to say that I had no idea what I was getting into when I published my first recipe; blogging is certainly more work than I ever imagined it would be…it’s also way more fun :)
Early on in my blogging “career”, I would visit the sites that had been around for a while- the ones that clearly had staying power- and wonder how the bloggers did it…how did they stay inspired and motivated day after day, month after month, year after year? What kept them going?
Well now I know the answer: it’s the readers and all the friends made along the way that keep a blog going. My life is so much better because of all of you!
As you may recall, my cousin got married last week. I’d heard some great things about The Newlywed Cookbook: Fresh Ideas and Modern Recipes for Cooking With and for Each Other![]() so I bought it for my cuz and her new hubby. Well, I loved the book so much I kept it for myself (and need to order them another copy)!
so I bought it for my cuz and her new hubby. Well, I loved the book so much I kept it for myself (and need to order them another copy)!
Author Sarah Copeland is my new hero: the book is filled with such beautiful recipes and writing…truly a celebration of building a life together filled with all things delicious. You absolutely do not have to be a newlywed to adore The Newlywed Cookbook, though- I strongly recommend you add it your collection.
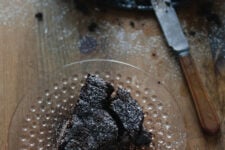
This chocolate tart is adapted from the book. It’s quite easy to make, yet it’s spectacular in both presentation and taste: fitting for a (blog) birthday (or Mother’s Day or any day, really). I am not exaggerating when I say that I could pretty much live on this tart, if that was an acceptable thing to do :)
If you need a gluten-free sweet tart crust, I’d try this one over at Serious Eats.
Once again, I am SO thankful for you my readers, and all of your support. I wish we could sit down together in my kitchen and each have a slice (or two) of this incredible tart, along with something bubbly to toast three great years!

[cft format=0]

In honor of my blog’s birthday, I’ll be hosting some giveaways this week and next. Check back soon for the first one!
Recipe for Salted Dark Chocolate Tart with an Olive Oil Crust
Ingredients
For the crust:
- *1/4 cup olive oil I used organic, extra virgin
- *3 tablespoons unrefined sugar I used Madhava blonde coconut sugar
- *1 teaspoon pure vanilla extract I use homemade
- *pinch of fine sea salt
- *1/2 cup organic unbleached white flour
- *1/2 cup white whole wheat flour or whole wheat pastry flour
For the filling:
- *1 cup organic full-fat coconut milk (I like Native Forest brand): please see directions for how to properly use the coconut milk in this recipe
- *2 tablespoons unrefined sugar I used Madhava blonde coconut sugar
- *pinch of fine sea salt
- *1 heaping cup 60% bittersweet chocolate chips or chopped bittersweet chocolate, preferably fair trade
- *1 large egg preferably organic/free range, beaten
- *coarse sea salt or smoked sea salt- optional I used large flake smoked sea salt
Instructions
- 1. Preheat your oven to 350 degrees F.
- 2. Make crust by whisking together the olive oil, coconut sugar, vanilla and sea salt. Add the flour(s) and stir everything together (Sarah says it should "feel like damp sand" at this point).
- 3. Use a piece of parchment (or rub a little olive oil on your hands) and press the dough evenly along the bottom and a bit up the sides of an 8-inch square or 9-inch round tart pan with a removable bottom (or use smaller, individual tart pans). Prick the crust all over with a fork and place in refrigerator until ready to bake, about 30 minutes.
- 3. After it has chilled, place the pan on a baking sheet and bake until golden brown and fragrant, about 25 minutes.
- 4. While the crust bakes, make the chocolate filling. Start by pouring the contents of one can of coconut milk into a medium bowl, and whisking it well so the thicker coconut cream is fully mixed with the thinner coconut water.
- 5. Measure out 1 cup of the coconut milk (refrigerate the rest and use in another recipe) and transfer it to a medium saucepan on the stove, along with 2 tablespoons sugar and a pinch of salt. Bring to a simmer, then remove from heat and add the chocolate. Allow chocolate to begin melting on its own, then stir it around until it is thoroughly combined with the coconut milk/sugar mixture.
- 6. Whisk the beaten egg into the chocolate filling (it will thicken), then pour everything into the hot crust. Turn oven temperature down to 300 degrees F. and return the tart to the oven.
- 7. Bake until the filling is set, but is still "a little wiggly" in the center, about 15 minutes. Sarah recommends checking after 13 minutes by "jiggling" the pan: only the center third should wobble. If it wobbles all the way to the edge, continue to bake for several minutes more. Note that the tart may take a bit longer to cook if you do use the coconut milk.
- 8. Remove the tart and allow it to cool before serving. After it's been out of the oven for 10-15 minutes, scatter sea salt across the surface. I used a large flake smoked sea salt for this: I broke some of the larger pieces up, but left others whole.
- 9. Remove tart from the pan sides and carefully transfer to a platter for serving. Sarah recommends letting it cool just until it slices easily, then serving it with a dollop of creme fraiche; I chilled mine and we ate it without adornment.